0. 들어가기
-. jinja2랑 vue의 표현식(?) 은 비슷해보여서 쉽게 적응할 수 있을 줄 알았다.
-. 중괄호 두개 ( {{ ~~ }} ) 사이에 vue로 전달받는 변수를 입력할 수 있다. (이게 앞에 포스트에서 사용한 vue 기본 사용법) 근데 링크 등을 전달할 땐 완전 다른 방법을 쓴다..? 구문 공부를하자.
-. 변수전달, 선택적 화면 표시, 이벤트 핸들링
1. Attribute binding
-. tag 내의 attribute를 전달할 땐 v-bind:attribute="vue 변수명" 의 구조로 이루어진다.
/* index.html */
<!DOCTYPE html>
<html lang="en">
<head>
<meta charset="UTF-8">
<title>Vue example</title>
<script src="http://unpkg.com/vue@3.0.0-beta.12/dist/vue.global.js"></script>
</head>
<body>
<div id="app">
<div class="product-display">
<div class="product-container">
<div class="product-image">
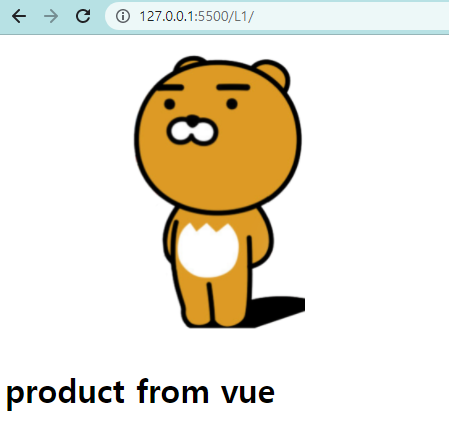
<img v-bind:src="image" width=300> <!-- 링크 전달은 v-bind:attribute 로 -->
</div>
<div class="product-info">
<h1> {{ product }} </h1> <!-- text 입력은 {{}} 안에 -->
</div>
</div>
</div>
</div>
<script src="./main.js"></script>
<script>
const mountedApp = app.mount('#app')
</script>
</body>
</html>
/* main.js */
app = Vue.createApp({
data: function() {
return {
product: "product from vue",
image: "./assets/images/ryan.png"
}
}
});
-. v-bind:attribute는 (다른거랑 충돌이 없다면) :attribute로 축약해서 쓸 수도 있다.
2. Conditional rendering
(조건에 따라 보여주고/안보여주고)
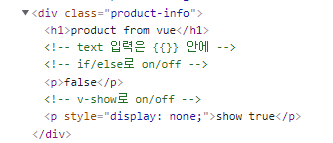
-. if문으로 제어 가능. v-if="true/false"
<div class="product-info">
    <p v-if="vKey">true</p>
    <p v-else>false</p>
</div>
-. v-show="key" 만으로 보이고 안보이고도 설정 가능
<div class="product-info">
    <p v-show="vKey">show true</p>
</div>
-. 두 경우에 표현되는 html 스크립트가 다르다.
-. 논리구문도 사용가능, else if도 가능하네.
<p v-if="number > 10">bigger than 10</p>
<p v-else-if="number <= 10 && number >= 0">smaller than 10</p>
<p v-else> minus </p>
3. List rendering
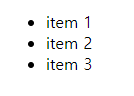
-. for 반복구문으로 list 표현하는 방법. v-for="for 조건문"
<ul>
    <li v-for="item in items"> {{ item }}</li>
</ul>

----
app = Vue.createApp({
    data: function() {
        return {
            product: "product from vue",
            image: "./assets/images/ryan.png",
            vKey: false,
            number: 11,
            items: ['item 1', 'item 2', 'item 3']
        }
    }
});
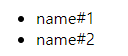
-. List<json> 형태의 데이터도 사용 가능. json.key 형태로 호출가능.
<ul>
    <li v-for="item in items"> {{ item.name }}</li>
</ul>

----
app = Vue.createApp({
    data: function() {
        return {
            product: "product from vue",
            image: "./assets/images/ryan.png",
            vKey: false,
            number: 11,
            items: [
                {id: 1, name: 'name#1'},
                {id: 2, name: 'name#2'},
                    ]
        }
    }
});
-. 각 <li> tag에 대해 key 값을 지정할 수 있다. 이 key가 뭔지는 조금 더 공부해봐야 겠는데, 대강 보니 react와 vue에서 사용하는, 동적 렌더링 시 변경에 대한 추적을 용이하게 하기 위한 고유값 부여인 듯 하다. (HTML 스크립트에선 안보인다)
-. 요래 쓰는듯
<ul>
    <li v-for="item in items" :key="item.id"> {{ item.name }}</li>
</ul>
4. Event Handling
-. 화면에서 동적으로 vue 변수 변경 및 표현
1) 버튼 클릭
-. vue 함수 설정 연습. v-on:click="함수" 구조로 vue의 변수 변경이 가능함.
<button class="button" v-on:click="clicks = clicks + 1">button</button> clicks = ( {{clicks}} )
-. 혹은 vue 스크립트에 methos: {} 부분에 함수를 추가하여 정의할 수 있음.
app = Vue.createApp({
    data: function() {
        return {
            product: "product from vue",
            image: "./assets/images/ryan.png",
            vKey: false,
            number: 11,
            items: [
                {id: 1, name: 'name#1'},
                {id: 1, name: 'name#2'},
                    ],
            clicks: 0
        }
    },
    //함수정의
    methods: {
        addClicks() {
            this.clicks += 1;
        }
    }
});
2) mouseover
-. 특정 tag에 마우스를 올리면 vue를 통해 변수 변경 -> 표시 text 변경 가능함. (슬슬 재밌다)
<ul>
    <li v-for="item in items" :key="item.id" @mouseover="updateText(item.name)">  {{ item.name }}</li>
</ul>

<h3> {{showText}} </h3>

/* main.js */
app = Vue.createApp({
    data: function() {
        return {
            product: "product from vue",
            image: "./assets/images/ryan.png",
            vKey: false,
            number: 11,
            items: [
                {id: 1, name: 'name#1'},
                {id: 1, name: 'name#2'},
                    ],
            clicks: 0,
            showText: 'init text'
        }
    },
    //함수정의
    methods: {
        addClicks() {
            this.clicks += 1;
        },
        updateText(targetText) {
            this.showText = targetText;
        }
    },
'Web > vue.js' 카테고리의 다른 글
| [vue.js] Router (0) | 2022.01.19 |
|---|---|
| [vue.js] vue 연습 (3) - components, properties (0) | 2022.01.16 |
| [vue.js] vue 연습 (2) - 동적 style/class, vue 계산식 (1) | 2022.01.15 |
| [vue.js] vue 시작 (0) | 2022.01.14 |
| [Vue.js] Vue.js 사용하기 with jinja2, flask (0) | 2021.03.22 |


최근댓글