0. 들어가기
-. 유튜브 링크를 기반으로 i) 영상 다운로드 ii) 자막이 있는 부분만 캡쳐해서 합성하는 코드를 짜보자.
-. 목적: 유튜브영상으로 짤 자동생성 / 주피터랩으로 작업해봄.
-. moviepy, opencv, PIL 사용함
1. 유튜브 영상 다운로드
-. pytube를 이용한 유튜브 영상 다운로드 코드
import pytube

MOVIE_URL = 'https://www.youtube.com/watch?v=FD5tIIkccHY'

yt = pytube.YouTube(MOVIE_URL,
        use_oauth=False,
        allow_oauth_cache=True
    )

movie_title = yt.title
print('target movie: ' + movie_title)

movie_target = yt.streams.filter(res='720p')

if movie_target.count==0: #no movie with filtering condition
    quit()
else: #if movie is exist
    #download first stream
    print(movie_target[0])
    movie_file = movie_target[0].download('downloads')


print('download 완료: ', movie_file)
-. 위와 같이 코드를 작성하고 실행하면 아래와 같이 파일 저장경로가 출력된다.
target movie: Friends: Rachel Finds Out (Season 1 Clip) | TBS
download 완료:  C:\servers\develope\movie_to_cartoon\Friends Rachel Finds Out (Season 1 Clip)  TBS.mp4
-. 조금 자세하게 살펴보자.
1) 제목 가져오기
-. pytube 패키지의 YouTube() 함수에 url 을 변수로 넣는 것 만으로 간단하게 유튜브 정보를 가져올 수 있다.
-. title 속성을 출력하면 그대로 유튜브 제목이 출력됨.
yt = pytube.YouTube(MOVIE_URL,
        use_oauth=False, # 필요 시 유튜브(구글) 로그인
        allow_oauth_cache=True # oauth 사용 시 로그인정보 캐싱(저장)
    )

print(yt.title)
>> Friends: Rachel Finds Out (Season 1 Clip) | TBS
2) 동영상(stream) 정보 필터링
-. 해당 링크에서 연결해주는 동영상의 종류(해상도, 영상 타입 등)에 대한 정보는 stream 속성에서 쉽게 볼 수 있다. 테스트로 사용한 Friends는 TBS에서 매우 다양한 타입의 영상을 제공한다.
for each in yt.streams:
    print(each)

----
<Stream: itag="17" mime_type="video/3gpp" res="144p" fps="12fps" vcodec="mp4v.20.3" acodec="mp4a.40.2" progressive="True" type="video">
<Stream: itag="18" mime_type="video/mp4" res="360p" fps="24fps" vcodec="avc1.42001E" acodec="mp4a.40.2" progressive="True" type="video">
<Stream: itag="22" mime_type="video/mp4" res="720p" fps="24fps" vcodec="avc1.64001F" acodec="mp4a.40.2" progressive="True" type="video">
<Stream: itag="137" mime_type="video/mp4" res="1080p" fps="24fps" vcodec="avc1.640028" progressive="False" type="video">
<Stream: itag="248" mime_type="video/webm" res="1080p" fps="24fps" vcodec="vp9" progressive="False" type="video">
<Stream: itag="399" mime_type="video/mp4" res="1080p" fps="24fps" vcodec="av01.0.08M.08" progressive="False" type="video">
<Stream: itag="136" mime_type="video/mp4" res="720p" fps="24fps" vcodec="avc1.4d401f" progressive="False" type="video">
<Stream: itag="247" mime_type="video/webm" res="720p" fps="24fps" vcodec="vp9" progressive="False" type="video">
<Stream: itag="398" mime_type="video/mp4" res="720p" fps="24fps" vcodec="av01.0.05M.08" progressive="False" type="video">
<Stream: itag="135" mime_type="video/mp4" res="480p" fps="24fps" vcodec="avc1.4d401e" progressive="False" type="video">
<Stream: itag="244" mime_type="video/webm" res="480p" fps="24fps" vcodec="vp9" progressive="False" type="video">
<Stream: itag="397" mime_type="video/mp4" res="480p" fps="24fps" vcodec="av01.0.04M.08" progressive="False" type="video">
<Stream: itag="134" mime_type="video/mp4" res="360p" fps="24fps" vcodec="avc1.4d401e" progressive="False" type="video">
<Stream: itag="243" mime_type="video/webm" res="360p" fps="24fps" vcodec="vp9" progressive="False" type="video">
<Stream: itag="396" mime_type="video/mp4" res="360p" fps="24fps" vcodec="av01.0.01M.08" progressive="False" type="video">
<Stream: itag="133" mime_type="video/mp4" res="240p" fps="24fps" vcodec="avc1.4d4015" progressive="False" type="video">
<Stream: itag="242" mime_type="video/webm" res="240p" fps="24fps" vcodec="vp9" progressive="False" type="video">
<Stream: itag="395" mime_type="video/mp4" res="240p" fps="24fps" vcodec="av01.0.00M.08" progressive="False" type="video">
<Stream: itag="160" mime_type="video/mp4" res="144p" fps="24fps" vcodec="avc1.4d400c" progressive="False" type="video">
<Stream: itag="278" mime_type="video/webm" res="144p" fps="24fps" vcodec="vp9" progressive="False" type="video">
<Stream: itag="394" mime_type="video/mp4" res="144p" fps="24fps" vcodec="av01.0.00M.08" progressive="False" type="video">
<Stream: itag="139" mime_type="audio/mp4" abr="48kbps" acodec="mp4a.40.5" progressive="False" type="audio">
<Stream: itag="140" mime_type="audio/mp4" abr="128kbps" acodec="mp4a.40.2" progressive="False" type="audio">
<Stream: itag="249" mime_type="audio/webm" abr="50kbps" acodec="opus" progressive="False" type="audio">
<Stream: itag="250" mime_type="audio/webm" abr="70kbps" acodec="opus" progressive="False" type="audio">
<Stream: itag="251" mime_type="audio/webm" abr="160kbps" acodec="opus" progressive="False" type="audio">
-. 해당 영상들은 list와 유사한 pytube.query.StreamQuery 타입의 변수이고, 원하는 종류의 영상 타입을 찾기 위한 filter 기능을 제공한다. 예를들어 화질 720p 기준으로 필터링을 해보자.
for each in yt.streams.filter(res='720p'):
    print(each)

----
<Stream: itag="22" mime_type="video/mp4" res="720p" fps="24fps" vcodec="avc1.64001F" acodec="mp4a.40.2" progressive="True" type="video">
<Stream: itag="136" mime_type="video/mp4" res="720p" fps="24fps" vcodec="avc1.4d401f" progressive="False" type="video">
<Stream: itag="247" mime_type="video/webm" res="720p" fps="24fps" vcodec="vp9" progressive="False" type="video">
<Stream: itag="398" mime_type="video/mp4" res="720p" fps="24fps" vcodec="av01.0.05M.08" progressive="False" type="video">
3) 동영상 다운로드
-. StreamQuery.download('폴더명') 로 매우 간단하게 가능하다. 폴더명 입력 안할 시 해당 파이썬이 실행되는 위치에 저장됨. 아래 예시코드는 720p 영상이 있을 경우 첫번째(유튜브 링크 접속 시 자동재생 되는 영상) 영상이 다운로드 된다.
movie_target = yt.streams.filter(res='720p')

if movie_target.count==0: #no movie with filtering condition
    quit()
else: #if movie is exist
    #download first stream
    print(movie_target[0])
    movie_file = movie_target[0].download('downloads')


print('download 완료: ', movie_file)

----
<Stream: itag="22" mime_type="video/mp4" res="720p" fps="24fps" vcodec="avc1.64001F" acodec="mp4a.40.2" progressive="True" type="video">
download 완료:  c:\servers\develope\movie_to_cartoon\downloads\Friends Rachel Finds Out (Season 1 Clip)  TBS.mp4
2. 자막 다운로드 및 시간, 자막 분할
-. 자막이 있는 장면을 캡쳐하기 위해, 우선 자막이 깔리는 영상의 시간을 확보해야 한다.
import xml, html
def xml_caption_to_caption_with_middle(xml_captions: str) -> str:
    segments = []
    root = xml.etree.ElementTree.fromstring(xml_captions)[1]
    i=0
    for child in list(root):
        if child.tag == 'p':
            caption = child.text
            if caption is not None:
                caption = html.unescape(caption.replace("\n", " ").replace("  ", " "),)
                try:
                    duration = int(child.attrib["d"])
                except KeyError:
                    duration = 0
                start = int(child.attrib["t"])

                middle = int(start + duration/2)

                segments.append((middle,caption))
    return segments

caption = yt.captions.get('en')
targets = xml_caption_to_caption_with_middle(caption.xml_captions)
1) 유튜브 자막 가져오기
-. .captions 속성으로 해당 영상의 자막 리스트 확인이 가능하다.
-. 대강 보면 'en'은 영어자막, 'a.en'은 자동 생성된 영어자막.
print(yt.captions)
----
{'en': <Caption lang="English" code="en">, 'a.en': <Caption lang="English (auto-generated)" code="a.en">}
-. 영상 하나에 여러가지 자막이 있을 수 있는데 (기본적으로 자동 생성되는 자막 포함) 이 중 필요한것을 가져오는건 하위 함수 .get('언어타입')으로 간단하게 실행 가능하다. 아래 예제를 보자.
caption = yt.captions.get('en')
print(caption)
print('----')
print(caption.xml_captions)
----
<Caption lang="English" code="en">
----
<?xml version="1.0" encoding="utf-8" ?><timedtext format="3">
<head>
<pen id="1" i="1"/>
<ws id="1" ju="0"/>
...
</head>
<body>
<p t="1000" d="4405" wp="1" ws="1">Okay, I'm...guessing this is from..</p>
<p t="9442" d="1068" wp="2" ws="1">Well, thank you, Melani.</p>
...
</body>
</timedtext>2) 자막 분할하기
-. xml 형태의 자막이 제공되는 것을 볼 수 있다. <body> tag 내에 <p t="시작시간" d="지속시간" > 자막내용 </p> 형태인 것을 쉽게 알 수 있고, wp랑 ws는 뭔지 모르겠다. 간단한 함수를 만들어서 이제 (자막의 중간시간, 자막내용)의 tuple list를 출력해보자. python의 xml과 html 패키지를 사용했다.
import xml, html
def xml_caption_to_caption_with_middle(xml_captions: str) -> str:
    segments = []
    root = xml.etree.ElementTree.fromstring(xml_captions)[1]
    i=0
    for child in list(root):
        if child.tag == 'p':
            caption = child.text
            if caption is not None:
                caption = html.unescape(caption.replace("\n", " ").replace("  ", " "),)
                try:
                    duration = int(child.attrib["d"])
                except KeyError:
                    duration = 0
                start = int(child.attrib["t"])

                middle = int(start + duration/2)

                segments.append((middle,caption))
    return segments

caption = yt.captions.get('en')
targets = xml_caption_to_caption_with_middle(caption.xml_captions)

print(targets)

----
[(3202, "Okay, I'm...guessing this is from.."), (9976, 'Well, thank you, Melani.'), ...]
3. 유튜브 영상캡쳐 + 자막합성
-. 이제 마지막으로, 유튜브 영상에서 특정 시간(여기서는 자막이 표시되는 중간지점)의 영상을 캡쳐하고, 자막을 붙여넣는 작업을 해본다.
1) 영상 캡쳐하기
-. opencv를 이용해 영상 캡쳐를 한다. PIL나 moviepy 등을 쓰는게 더 가벼울 수 있는데, opencv의 처리속도가 빠른거같은 느낌때문에 그냥 opencv 쓰기로 했다. (라이브러리가 젤 크다).
-. opencv의 VideoCapture, VideoCapture.read 함수를 사용한다. 마지막 imwrite함수는 이미지 쓰기 (저장)에 성공할 경우 True를 리턴한다. (실패 시 당연히 False)
import cv2
vidcap = cv2.VideoCapture(movie_file)
sec = 10
vidcap.set(cv2.CAP_PROP_POS_MSEC,sec*1000)
hasFrames,image = vidcap.read()
if hasFrames:
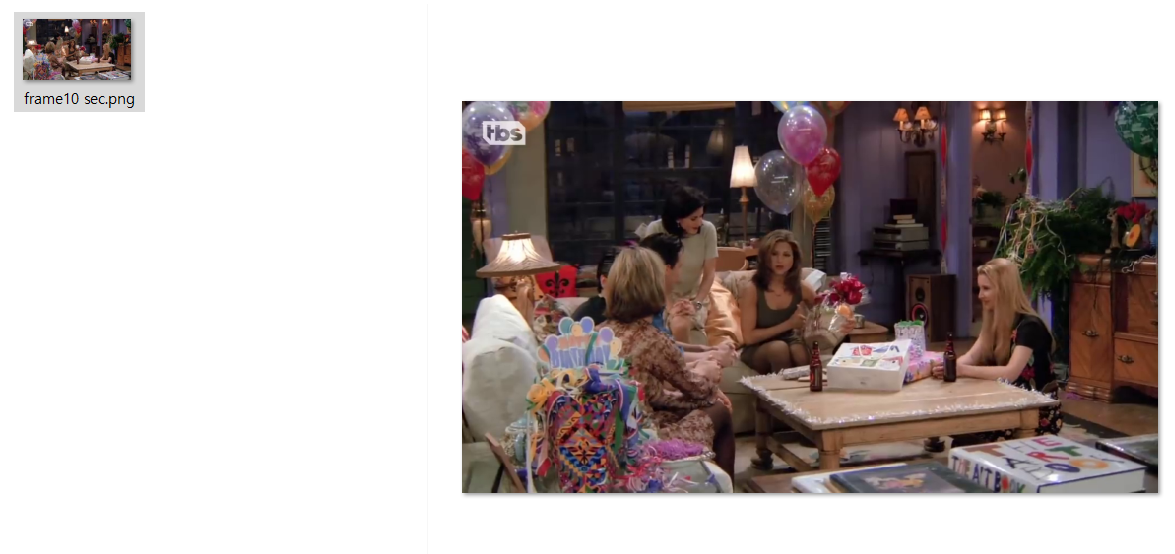
r = cv2.imwrite("./capture/frame"+str(sec)+" sec.png", image) # save frame as PNG file
print(r)
--
True-. 지정한 디렉토리에 들어가면 아래와 같이 이미지 하나 캡쳐된 것을 확인할 수 있다.
2) 연속 영상 캡쳐
-. 앞에서 자막에서 시간/자막내용을 분리하는 작업을 했으니 이젠 해당 시간들에 대해 반복적으로 캡쳐하는 작업을 해야한다. 단순한 반복문이니 코드만.
def get_movie_frame(movie_file, time):
    vidcap = cv2.VideoCapture(movie_file)

    vidcap.set(cv2.CAP_PROP_POS_MSEC,time)
    hasFrames,image = vidcap.read()
    if hasFrames:
        return image
    else:
        return None
3) 영상에 자막 입히기
-. 마지막으로, 영상에 자막을 입히는 작업을 하자.
-. 여기서는 PIL 패키지를 이용하는데, 원래 opencv만으로도 텍스트 입력은 가능하나, 폰트의 제약이 있어서 어쩔수없이 PIL을 사용하게 됐다. (난 고딕이 좋다.)
def input_text_on_image(img, text):
    cv2_im_rgb = cv2.cvtColor(img, cv2.COLOR_BGR2RGB)
    pil_im = Image.fromarray(cv2_im_rgb)

    draw = ImageDraw.Draw(pil_im)

    # Choose a font
    font = ImageFont.truetype("./kbizgothic.ttf", 50)

    # Draw the text
    textw, texth = draw.textsize(text, font=font)
    h, w, v = img.shape
    topLeftCornerOfText = (int(w/2 - textw/2), int(h*0.95 - texth))
    # draw.text(topLeftCornerOfText, "Your Text Here", font=font)
    draw.text(topLeftCornerOfText, text, font=font)

    # Save the image
    cv2_im_processed = cv2.cvtColor(np.array(pil_im), cv2.COLOR_RGB2BGR)
    return cv2_im_processed
-. 영상 연속캡쳐 함수와 결합하면, 아래와 같이 자막이 있는 장면만 캡쳐해서 자막을 달아주는 결과를 얻을 수 있다.
for each in targets:
    time = each[0]
    text = each[1]
    frame = get_movie_frame(movie_file, time)
    if frame is not None:
        img = input_text_on_image(frame, text)

        cv2.imwrite("./capture/image_with_text"+str(time)+"_miliseconds.png", img)     # save frame as PNG file
    else:
        print(frame)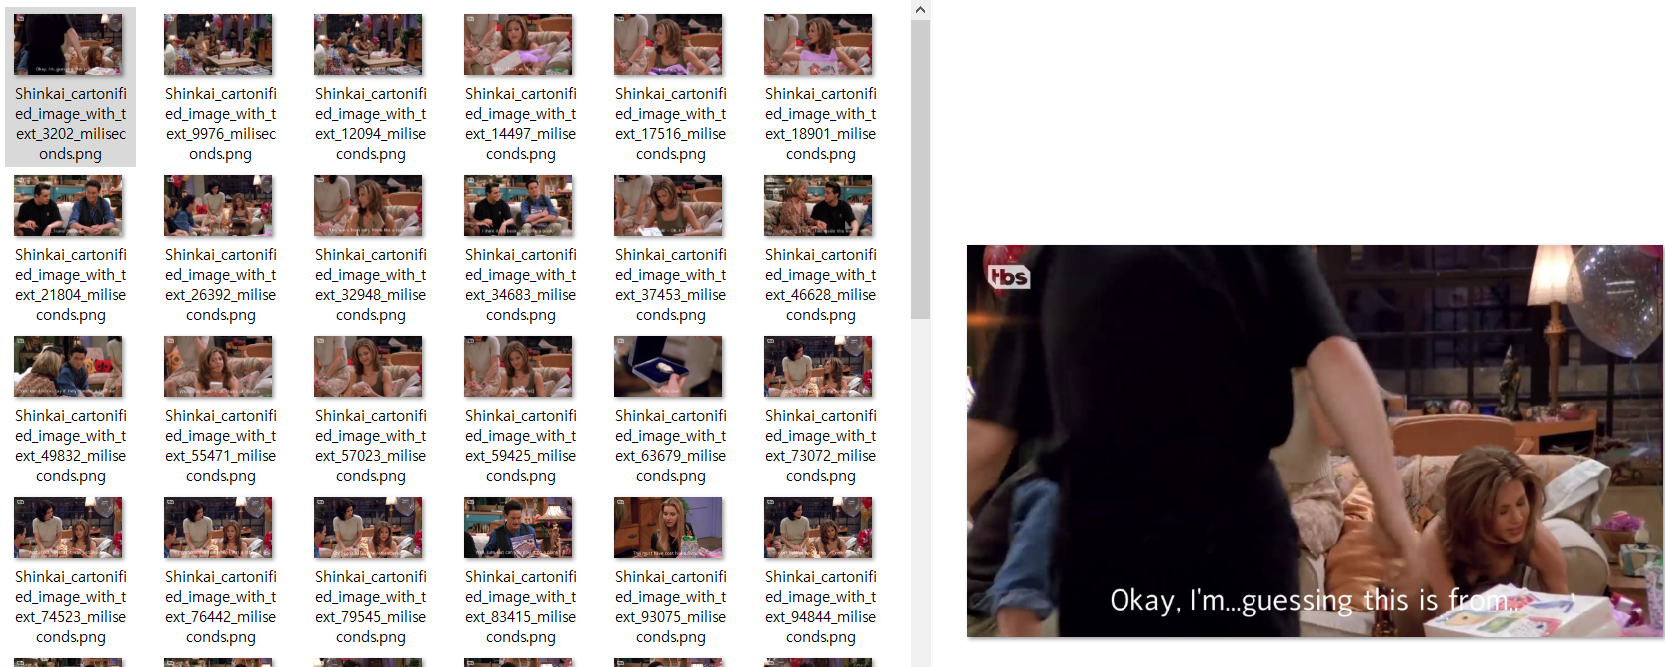
-. GIF 파일로 편집하면, 아래와 같이 주인공들의 대사가 보이는 짤방이 만들어진다.
'python' 카테고리의 다른 글
| [KAKAO + FLASK] 카카오 챗봇 만들기 (5) - 챗봇으로 사진받기 (6) | 2022.01.04 |
|---|---|
| [KAKAO + FLASK] 카카오 챗봇 만들기 (4) - 챗봇 출력 예제 (0) | 2021.12.26 |
| [KAKAO + FLASK] 카카오 챗봇 만들기 (3) - API 서버 연동 (3) | 2021.12.18 |
| [KAKAO + FLASK] 카카오 챗봇 만들기 (2) - 시나리오, 엔티티 (0) | 2021.12.13 |
| [KAKAO + FLASK] 카카오 챗봇 만들기 (1) - 시작 (0) | 2021.12.03 |


최근댓글